import os
import torch
import torchvision
from torch.autograd import Variable
import torch.nn as nn
import torch.nn.functional as F
from torch.utils.data import DataLoader
from torchvision import transforms
import numpy as np
import cv2
from PIL import Image
# U-2-Net 모델 불러오기
from model import U2NET
model_dir = 'saved_models/u2net/u2net.pth' # 사전 훈련된 모델 경로
# 이미지 전처리 함수
def transform_image(image):
transform = transforms.Compose([
transforms.Resize((320, 320)),
transforms.ToTensor(),
transforms.Normalize(mean=[0.485, 0.456, 0.406],
std=[0.229, 0.224, 0.225])
])
return transform(image)
# 모델 출력 정규화 함수
def normalize_output(d):
ma = torch.max(d)
mi = torch.min(d)
dn = (d-mi)/(ma-mi)
return dn
# 모델 로드 및 평가 모드 설정
def load_model():
net = U2NET(3, 1)
if torch.cuda.is_available():
net.load_state_dict(torch.load(model_dir))
net.cuda()
else:
net.load_state_dict(torch.load(model_dir, map_location='cpu'))
net.eval()
return net
# 이미지 테스트 함수
def test_single_image(net, image_path):
# 이미지 로드
image = Image.open(image_path).convert('RGB')
image_cv = cv2.imread(image_path)
image_cv = cv2.resize(image_cv, (320, 320))
inputs = transform_image(image)
# 배치 차원 추가 및 모델에 입력
inputs = inputs.unsqueeze(0)
if torch.cuda.is_available():
inputs = inputs.cuda()
# 모델 추론
with torch.no_grad():
d1, d2, d3, d4, d5, d6, d7 = net(inputs)
# 결과 처리 (d1이 최종 출력)
pred = d1[:, 0, :, :]
pred = normalize_output(pred)
# numpy 배열로 변환
pred = pred.squeeze().cpu().numpy()
# 마스크 생성
mask = (pred * 255).astype(np.uint8)
# 원본 이미지에 마스크 적용
image_np = np.array(image.resize((320, 320)))
mask_3channel = np.stack([mask, mask, mask], axis=2)
result = (image_np * (mask_3channel / 255.0)).astype(np.uint8)
# BGR로 변환 (OpenCV는 BGR 형식 사용)
result_bgr = cv2.cvtColor(result, cv2.COLOR_RGB2BGR)
# 시각화 이미지 생성
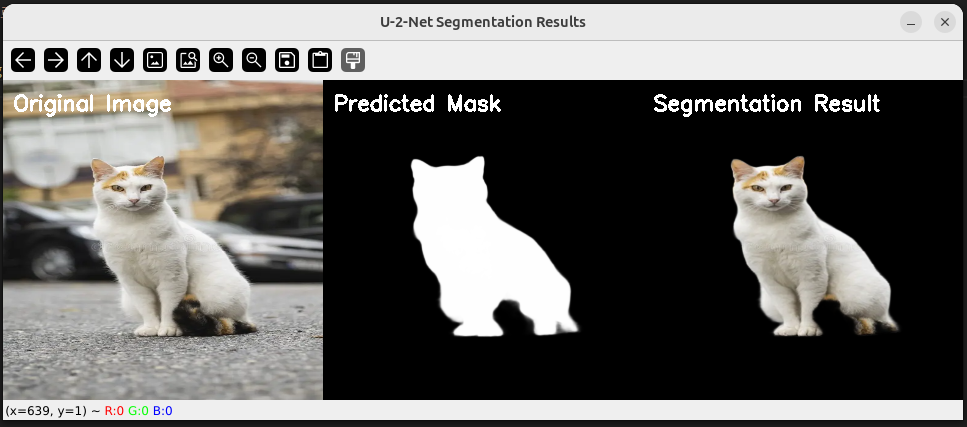
# 원본, 마스크, 결과를 가로로 합치기
vis_width = 320 * 3
vis_height = 320
visualization = np.zeros((vis_height, vis_width, 3), dtype=np.uint8)
# 원본 이미지
visualization[:, 0:320, :] = image_cv
# 마스크 (그레이스케일을 BGR로 변환)
mask_bgr = cv2.cvtColor(mask, cv2.COLOR_GRAY2BGR)
visualization[:, 320:640, :] = mask_bgr
# 결과 이미지
visualization[:, 640:960, :] = result_bgr
# 텍스트 추가
font = cv2.FONT_HERSHEY_SIMPLEX
cv2.putText(visualization, 'Original Image', (10, 30), font, 0.7, (255, 255, 255), 2)
cv2.putText(visualization, 'Predicted Mask', (330, 30), font, 0.7, (255, 255, 255), 2)
cv2.putText(visualization, 'Segmentation Result', (650, 30), font, 0.7, (255, 255, 255), 2)
# 화면에 표시
cv2.imshow("U-2-Net Segmentation Results", visualization)
cv2.waitKey(0) # 키 입력 대기
return pred, result
if __name__ == "__main__":
# 모델 로드
net = load_model()
print("모델이 성공적으로 로드되었습니다.")
mask, result = test_single_image(net, 'cat.png')
cv2.destroyAllWindows() # 모든 창 닫기 |

Member discussion